
Building Wardrobes Using B&Q Sliding Glass Doors
Building Wardrobes Using B&Q Sliding Glass Doors
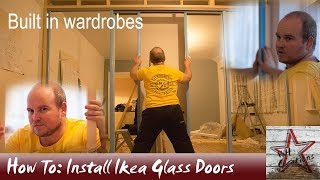 How to build a frame for the hanging of Ikea sliding doors.
It seems every year instead of presents for my parents they get me to do some kind of a job around the house. Last year they wanted their bathroom remodelled, and this year its new built in wardrobes for their bedroom.
After listening to what my dad had in mind I just had to step in and save him from destroying another room.
This was meant to be a two part series but my mum has decided to remodel the interior herself.
In this video we frame out for Ikea glass sliding doors along with building 3 platforms to help hide the disastrous wallpapering which was undertaken by my dad.
Email: whcreationsyt@gmail.com
Facebook: https://www.facebook.com/WHCreationsYouTube/
eBay: https://goo.gl/jMmrC4
Pinterest: https://uk.pinterest.com/WHCreationsYT/
Twitter: https://twitter.com/WHCreations22
Instagram: https://www.instagram.com/whcreationsyt/
Etsy: https://www.etsy.com/uk/shop/WHCreationsSales
-~-~~-~~~-~~-~-
Please watch: “DIY Homemade Crucible Tongs For Use With My Devil Forge”
-~-~~-~~~-~~-~-
Did you finish this job?
Why not Screw top rail to ceiling then just adjust nogging height to get bottom rail level…. Much easier
Ive got a lovely sliding door bensons for beds wardrobe and ive always wondered if the doors could be taken off and incorporated into a built in wardrobe. By the looks of it yes but id need a tradesman with your patience
Well thought out job. Just wondering though why you leveled the ceiling. Would it not have been easier to level the lower rail and cut the noggins accordingly. Not a criticism at all, just a suggestion. Nice job though
Nice video, thanks! I’m installing my own fitted wardrobes as well. What type of wood (soft, hard, etc) did you used for the door frames (i.e. fixed to the ceiling, walls and floor)?
Great video. It’s how I would’ve tackled the job too, so it’s given me confidence as a DIY’er to know I’m doing it right. Thank you.
Doing a retro here and thought of same idea from Ikea, gonna do a slider between bedroom and bathroom. Will post vid in a couple weeks. Great work!
@ 7:09 wast impressive though
Great stuff thank you
Nice fart and excellent job and tutorial.
part 2 ever made?
Thank you for your excellent video. It truly is 6 star
where is part 2
Good work overcoming the wonky room. Looking forward to part 2
How do I watch the second ideo of you finishing this project. I’m struggling to find it. Thankyou
Id like to do something similar, difference is mine would be going "wall to wall". Its a much smaller room, to the left hand side would be the door/entrance to the room so I would need to put a show end on it. Wondering what I could use, maybe a high gloss section like they use on a tall kitchen unit? also, on your design there is timber visible to the right which looks proud of the sliding doors. Would you just paint that or did you cover it with something? Cheers
Hi Will . if you would like to do this kind of work as a job please contact unflatpack.com and ask for Denver. We do IKEA fitted bedrooms and are looking for installers for the National programme
I need to hire you i think?!
Great technical adjustments.
Where is part 2?
Have you got a after photo of the mdf around the doors . Thanks
Where’s the second video
The best DIY video I’ve seen ever.
Ace hold music.
Meddling old woman, walks out farting. 🤣
Quality vid. After watching this, I would love to have a go myself. Do you have any pics of the finished article with the MDF surround? Also, do you thing you could do this by laying the base of the frame on carpet and screwing it through, without having to take the carpet up?
Nice one mate. I’m building one too this was great. Very informative.
I’ve never seen anyone drop one in the middle of a how-to-video before, that’s quality!
Subbed just for the fart alone 🤣
Is there a part 2?
You had me at Nick Zammeti
Mate are wheels included with the door ?
That was a majestic solo from the wind section there. Good arse!
Great video too, very helpful!
Nice job, I really like your tutorial and talk-through directions. I’ve been wanting to do similar job for a long while and this has given me an idea on how to do it finally. Thanks for the video
Thanks for the video. Great guide for a similar project I’m starting.
My joist in ceiling is right next to the breast which isn’t deep enough, and the next 1 is 17 inch which is to much , how do I fix this mate
Hi how much do these doors cost and you have the name of them as i cant seem to find them
good video given confidence to try this myself thanks
Nice work mate!!! Poor old dad !!!
Are wheels included with the door ?
Iv never known a decent way of finding the ceiling joists. Would knocking along the ceiling to find a hard part like you do on stud walls and maybe running a magnet to find any screw or nail heads
Love the T-shirt
Just a question. Did you design your framing so the "opening" was the same size as all the doors together when fully closed?
Great video with some humour thrown in!
Just wondering if the rails you’re using are standard ikea ones? I didn’t realise that they spanned that much space. Advice on where to get compatible rail would be really really welcome!! Cheers
This vid came up on my recommended list, fitted these same doors for a customer. Same kind of problems, nothing straight and a bit of messing about reseating the metal frame on the mirror properly, but like you say, the glide action on them is nice and smooth. You could have used some strips of timber to create the door rebates, the mdf panels would have covered the joints. The only trouble with these kind of kits is you can sometimes spend as much time working out vague instructions as doing the work.
Where’s part 2?????
wished you could of shown how to put the runners on the doors
Brilliant video 👍This is what a real how to build sliding wardrobes unit should be. Dealing with real issues with walls and ceilings and floors that aren’t straight. Weekend’s coming up fast so better get buying some timber etc. Look forward to the next project! 👍
What do you think about fixing the bottom rail onto carpet or perhaps screw a piece of timber either 1×2 or 2×2 over the carpet and then install the rail ontop
Hello when u drill into the ceiling do you have to drill to to a joist
Excellent work mate!! I’m subscribing …good honest review 👍
Good job, doing a similar build right now and got some good tips from your video.