
Camper Van Electrical System – Comprehensive Look!
Camper Van Electrical System – Comprehensive Look!
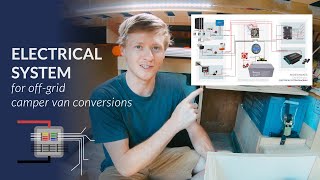 Electrical diagram available here:
https://www.mosermakes.com/articles/camper-van-budget-electrical-system
Find all my van build videos in this playlist:
Products used in my electrical system:
Battery: https://amzn.to/3a7KDxE
Battery Monitor: https://amzn.to/2CyGCYi
System Hub: https://amzn.to/3b5MJ29
System Switch: https://amzn.to/39ZEDa8
Solar Panels: https://amzn.to/34wSPpU
Solar Charge Controller: https://amzn.to/2vMHaXc
MC4 Connectors: https://amzn.to/2XyQRUs
MC4 Extension cables: https://amzn.to/3b9WzA4
Cable Entry Gland: https://amzn.to/2RD4rma
Cutoff Switch: https://amzn.to/3a1wiTb
Alternator/B2B Charger: https://amzn.to/2WEp3xA
AC Charger: https://amzn.to/2J6zbqL
3 Position Switch: https://amzn.to/2xpfLLy
Inverter: https://amzn.to/2VrLpjv
Recessed receptacle: https://amzn.to/3cgJLIi
Fuse Holders
Terminal Fuse Holder: https://amzn.to/3cgBaWd
MIDI Fuse Holder: https://amzn.to/3a19OSo
DC Fuse box: https://amzn.to/3a9VdUK
Wires:
2/0 AWG Red + Black: https://amzn.to/3cgJN3a
2 AWG Black: https://amzn.to/2RBf097
8 AWG Red + Black: https://amzn.to/2xus09E
12 AWG Marine Grade Duplex: https://amzn.to/2V4SF5T
14 AWG Marine Grade Duplex: https://amzn.to/3caXnoo
Blue Sea GUIDE TO WIRE AND FUSE SIZING:
https://www.bluesea.com/resources/1437
———————————————
https://www.mosermakes.com
https://www.instagram.com/mosermakes/
———————————————
NIce work here Sam!!! Thank you for this video!!!
If you have a transit with dual agm batteries, is that set up like this? Aside from solar and outside charging obviously.
Guau… que increible señor
So if i wanted to be able to run a computer and tv, how long would that battery last?
do you have the diagram with the bus bars available instead of the hub?
Very professional video! Thank you for the guidance.
Outstanding Video and thank you so much for taking your time to share with us! Thank you so much!
Hey Sam, great video, got a question regarding your alternator power setup. Why did you attach a separate ground wire from the van battery to the negative busbar of that safety hub? Presuming that busbar is grounded to the van chassis (via its connection to the renogy battery (which would be grounded to the chassis)), why didn’t you just entirely omit that separate ground wire, and rely on the fact that the vehicle battery is grounded to chassis, and the neg. safety hub busbar is grounded to vehicle chassis, so in effect, the chassis acts as that ground wire. I’m about to install my Victron non-isolated DC-DC charger, and it seems to eliminate the ground wire you included in its installation instructions, relying instead on the fact that everything is connected to chassis ground. Thanks Sam, I’ve learned a lot from your great videos. I hope all is well.
How l, can buy the fues boxes ? Both boxes thanks and where ? Thanks
Sam – I just replaced 4 Lifeline AGM batteries (got 7 years out of them) with a new set in my Chevy van camper. I often carry 2 sea kayaks on the pop-up roof, so solar panels are out of the question. I just added a Victron Orion dc to dc charger in order to properly charge the batteries while driving. After watching way too many RV electrical videos, I stumbled upon yours. I am a retired teacher, who knows much more about art/photography than 12 volt electrical systems. I also know good teaching when I see it and you have the gift. Your Camper Van Electrical System – Comprehensive Look! is full of useful information and is beautifully presented. I have already made a few electrical changes because of what I learned from you. Thank you!
Having the wires rated at a lower amperage than the fuses is dangerous. It means the wire will fail first (overheating and potentially causing a fire) before the fuse can kick in and break the circuit.
What size fuse would you use for a 100 ah battery off the terminal 150 amp?
If I use resettable inline breaker type fuses, do I really need all those on/off switches? Can’t I just trip the breaker on the fuse to turn it off?
Wow, I went from basically knowing nothing about camper electrical to feeling quite confident setting up my van project… Thanks!
I just have one question please … Is there a more cost effective way to do the electrical (12V only, I doubt I will use an inverter for now) as here in Canada those batteries are run around $700+. For my first project I would probably be using some interior lighting and a fridge with propane stove… and probably some way to charge my laptop / tablet and phone
Thank you
Best campervan electrical system explanation I have seen. Thanks for your time!
Could this work in a skoolie
Hey Sam. Question…. For the 2-way switch, do you have the AC charger going in the output of the switch? Input 1 in the vehicle battery? Input 2 into the system hub? Thanks for all you do to support other builders!
so so helpful! Thanks!
Wow most complete wiring video I’ve ever seen made simple thank you so much. 💜🦋💕
I really miss watching your videos as you are so clear and concise. We are finally about to start our van build and I have come back to your lessons to guide us,.
How do you choose when to use alternator or solar panel to charge why driving IF you only want to use solar to charge? And how do you make sure you not take all the power from your car battery when charging from your alternator?
Best video I have ever seen on 12v installation!
Excellent video and very informative. I’m designing my system and am new to this. Is your system grounded? I don’t see the ground in your diagram. Thx
Very nice set up and well thought out. However, allow me to recommend a small change. Years ago, two of my friends both worked in a factory that built Power inverters. We were all sitting around a camp fire and I started telling them about how I was having trouble with a cheap 300 w inverter. I told them that when I first bought it, it worked great but for some reason I couldn’t get it to power my power tools anymore. The first thing my friends asked was how long were my battery cables going to the inverter. I told him about 10 feet. The second thing they asked me was the gage of the cable. Long story short, The gage was okay, however they explained to me that the 10ft length was the reason for my problem. They explained that inverters are very sensitive to resistance. They told me that DC power in general does not carry amps very well over longer distance. I was told to get as close the be battery as possible. With a little math we figured out the resistance in the line which brought the inverter efficiency down to less than 50%. I didn’t want to believe them. I’m a DC guy. About a year later I read that the reason we use AC power in our homes is because it is not effected by line length. So the time came that I dusted off my little inverter, shortened the cable down to 1 ft and mounted it as close to the battery as possible. Now I’m an AC guy. Suddenly my inverter was putting out 95% efficiency. It was running better than when I first bought it. What I learned was when it comes to inverters keep the battery cables as close to the battery as possible. Today I have a 5000 W inverter and the same principal remains solid. You can test this theory like I did. The results will surprise you. I happily used that little inverter for smaller loads for over 30 years. It was still working great when I sold my van. I just wanted to clarify this to your viewers because you had suggested keeping the negative lead far away from the shunt. However I did see in the beginning of your video that your inverter location is practically sitting on top of your battery. That’s why your system is working. Cheers!
Easily the best video online for setting this up
this video is outstanding! thank you so much!! I’m hoping I won’t need most of this, but I felt it essential I knew what everything was, and understood the safety side more! very well done mate!!
I’ve had my system in for two years now after this video. I finally put an inverter in & glad yo recommend running it to the busbars instead of directly to the battery, porobaby do a video this week on YouTube & mention you.
I would like to know the software he is using to carry out this electrical system diagram. maybe paint……..
Im not even a minute in and this guy is already badass
Your awesome bro Thankyou
Great Job,⭐️⭐️⭐️⭐️⭐️
Seriously mate, this was the most comprehensive and helpful video for newbies like myself that i could find. Absolutely brilliant. You should be a teacher.
Great vid Sam! I see a couple places where current is flowing in two different directions on the same wire, most notably on the positive connection between the SafetyHub and the house battery. Has this proven to be an issue?
Best video I have ever seen on 12v installation!
Thanks for making this video. Could the 12v loads be wired to the main safety hub, instead of the separate fuse block? It looks like there’s room for more low amperage loads coming off the right side of the hub.
And is there just one ground in the whole system coming off the main hub?
This has to be one of the best instructional videos I’ve ever seen. Well done.
Great video! Thank you.
Thank you for the great videos. With the breaker between the controller and the battery. Should the load side be coming from the battery? Thanks
great video explain clearly love it i will try to do the same setup configuration right your . i been looking for this kind information to build my Van thank you good jobs.
Can I copy this system with 350 watts of solar panels? (2×175)
Great video!!
Brilliant.
well produced, informative, and easy to follow. Saved for future reference–thanks!
Great instructions . Thank you !
Accent too annoying
what would happen if you let the shore power also go through the dc-dc charger
You’re an icon. Thank you
10/10 vid
👌👌👌👌👌
Awesome explanation! Does the layout remain same when using a 30 amp shore charger?