
How To Install Epoxy Floors In A 2000 sq ft Home | Step By step Explained | PART 2
How To Install Epoxy Floors In A 2000 sq ft Home | Step By step Explained | PART 2
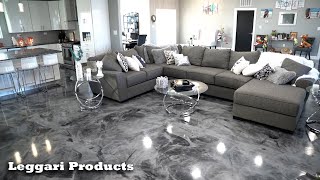 This project was done in a 2000 sqft home and it turned out incredible! It was done over an existing epoxy surface that did not hold up to industrial grade standards so the homeowners decided to resurface it with Leggari! Our epoxy is industrial grade and American Made! Our kits also come with a lifetime warranty, giving you the assurance that we mean what we say!
This is Part 2 of How To Install Epoxy Floors Full Installation Step By Step Explained. We go over how to properly mix epoxy, and how to apply it. We used a silver base and black highlights for this floor. Along with liquid diamonds dispersing effects to get this look! We also go over how to mix and apply the top coat and how to remove tape. Then it’s the big reveal of how it turned out! After watching these videos you will be ready to install your floor!
Watch part 1 here: https://youtu.be/gPO-yLKSYiQ
Recap of what you’ll find in this video 👇
Project Intro: 0:00
How To Mix Epoxy: 0:49
Applying Epoxy: 4:29
How To Mix Top Coat:r: 30:10
Applying Top Coat: 34:51
Removing Tape: 53:57
Final Look: 55:34
You can order your floor kit here: https://leggari.com/floors/order-flooring/
You can always purchase epoxy and metallics here👇
Primer: https://leggari.com/product/wb-primer/
Epoxy: https://leggari.com/product/metallic-epoxy/
Metallics: https://leggari.com/product/metallic-pigments/
Leggari Effects: https://leggari.com/product/leggari-effects/
Read more info on the products here: 👇
Primer: https://coatings.leggari.com/view/137924/
Epoxy: https://coatings.leggari.com/view/952555/
Metallics: https://coatings.leggari.com/view/266049/
Floor Kits: https://coatings.leggari.com/view/364043/
Leggari Effects: https://coatings.leggari.com/view/94785/
Leggari Floor Kits were designed to transform your floors into something new and unique by coating your existing concrete, tile, or wood flooring. Floor Kits are fun and easy to install. You can have a designer floor that will last for decades in 2 days with our unique floor kits, custom made to your projects square footage.
Learn about the floor installation process here:
PREPPING THE SUBSTRATE OR SURFACE
One of the best ways to prep your surface is diamond grinding. You can rent concrete grinders at most rental stores. The next best way is using an etching chemical to etch the surface of the concrete. You can also sand the surface if the before mentioned methods can’t be done. If you can only prep minimally or can’t prep at all we have a Prep Replacement Primer to help achieve a strong bond. We always recommend prepping the concrete surface first.
PRIMING THE SUBSTRATE OR SURFACE
Priming the floor is simple and fast. Mix your pre-measured primer then dip and roll the pigmented primer across the surface until the floor is completely pigmented. Wait 1 hr (or until tacky and not coming off to the touch) and start applying the Base Coat.
METALLIC EPOXY COAT
Applying the Base Coat and Highlights is the funnest part. Mix your pre-measured Base Coat, pour it out across the floor and begin to spread out the epoxy with your rubber squeegee getting it as even as you can. Our Epoxy self-levels so don’t worry about getting it perfectly even. Quickly roll over the surface with your paint roller to help even out the epoxy. Now mix your pre-measured highlight color and apply it to the base color, then blend it to your desired look.
HIGH WEAR TOP COAT
We offer 2 different gloss sheens in our Urethane Top Coat. The Top Coat comes with the option to have a High Gloss or a Matte Finish. It needs to be rolled out super thin and leaves a minor texture which gives it the extra durability. Apply it within 24 hrs of installing your floor kit or you will need to sand the surface before applying it.
**APPLICATION DETAILS ARE ADDRESSED IN OUR TUTORIAL VIDEOS
About Us:
Leggari is a coating based channel (metallic epoxy & concrete overlay) that will show you how you can use our products as amazing DIY projects to transform your existing surfaces! You can renovate things like kitchens, bathrooms, basements, patios & more! With Leggari you can renovate in no time, imitating real stone or creating a designer concrete look!
You can watch hundreds of videos that show you the step by step process of resurfacing your existing surfaces!
– Tim Krumland and Tylor Svangren, Leggari Founders
#leggari #epoxyfloor #epoxyflooring
FIND US ON SOCIAL MEDIA
Our Social Media is filled with projects done by customers around the world and we also give sneak peeks of projects we’re working on, stay up to date and follow us!
Instagram: https://www.instagram.com/leggari/
Facebook: https://business.facebook.com/leggari
Pinterest: https://www.pinterest.com/leggari/
Twitter: https://twitter.com/leggari
If you look closely at 16:53 when he first starts spreading.
He created an animal (Dog) face without even knowing or seeing it😱😱😱😱😱😱😱😱
Can You see it??🤔🤔🤔🤔🤔🤔🤔🤔🤔
How many gallons for base coat
Can the top coat be clear? As in not white? Coz i kinda love the look of the floor without topcoat. Like a mirror.
any advice on maintenance? ie if something heavy scratches it?
subbed
Amazing job! You are great fellows! How much did this work cost for the client?
Fantastic video guy’s.
Is top coat necessary or optional? I like how glossy it was before the top coat!
Is there a top coat that makes it more shinier than that?
END RESULTS NOT LIKE A MIRRIOR
DISLIKE DONT WORK THANKS DEMONCTARTS
How much you total cost?
A like grey too but the room came out completely tasteless… what a waste of epoxy
Is there any problem if is underfloor heating
Did you use fillers for the resin? If yes what was the quantity used per batch?
He’s walking on air no foot prints 🤣🤣
To make this one is cheaper than tiles?..any respond pls i need ur opinion
Wao.beautiful.these guys are masters…❤️❤️❤️❤️
What was the cost including materials and labor for the 2000 sq ft home?
are you waking on it WET? HOW MUCH IT COST TO DO FLOOR 4BY 4 METER 144 S FOOT?
HOW MUCH DID YOU SPEND ON THIS FLOOR ..?
Are you wearing metal kleats while working the epoxy?
You guys are the best tutorial ever.. Now, I have the ideas then my husband does it. I would like to get my floor done.
Before adding all those stuff what is the first coat to go down on the floor.. I didn’t saw that part of work in the video, i sure that all those stuff can’t go down on bey concrete
Very nice 👌 helpful tips 👍 good job
How much for a 2000 sq ft home
Wooo incredible videos, watching from Indonesia good to see , that and good job 👏 I love the way how made it.
I want to do this to my tile floor is it possible ?
This is the greatest video ever uploaded on YouTube
You’ll do a good job but don’t think I would want my floors done. Color too blotchy.
U guys need to show the name of the product u been using good job beautiful..were could i get those products to buy?
Can we hire you?
Your service is in Pakistan 🇵🇰?
WOW WOW ABSOLUTELY STUNNING🖤💎🖤💎🖤💎🖤
Are you using baseball cleats for walking on the floor ?
Excelente trabajo 👍🏼
Omg 😲 this is beautiful
Oh my Goodness, I’m speechless! I never seen something like that. What a great Job. Well done 👍👍
Wonderful!
Can this be done on chips flooring directly?
I preferred the glass like finish before the topcoat. The topcoat looked satin and stipule?
I just curious what kind of shoes that you wearing
I’m readyyyyy to get my floor done. When can you get started? Wow, you guys are awesome😀😀😀😀😀😀
I don’t understand how you can just walk in it. Tf
ไม่ทราบลักษณะของอืพร็อกซนิดผงผสมน้ำ..และเลย์ซินชนิดแผงผสมน้ำมืมั๊ยครับ..อุดม..nick..อาจจะมีน้ำชนิดใหม่สามารถทำให้แห้งเร็ว
I’m impressed.. Love from India ❤
Can be applied over heated floor?
After two countertops i was able to pinpoint that the soft spots were due to mixing. It was a learning process but the quality of my work is so much better now.
Crazy! Looks so wonderful!
Lo malo es que el inglés. No es mi fuerte …cuando menos fuera en alemán…
Good job! Question: Are you use a special shoes to walk on the floor?