
How to Install Laminate Flooring for beginners
How to Install Laminate Flooring for beginners
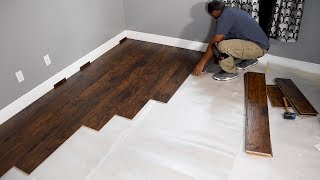 In this video, I am showing how to install laminate flooring for the first time.
Check out http://becomeaframer.com/diycreators to learn more about becoming a framer, and enter to win a Home Depot gift card and Estwing Pro Framing Hammer.
Woodworking Plans: https://gumroad.com/diycreators
Flooring used in the video: https://homedepot.sjv.io/zYnVe
Tool needed/ Used for laminate floor installation
*********Affiliate Links**********
– Miter saw https://amzn.to/2ZMKaj3
– Pull bar https://amzn.to/34uX7hd
– Pry bar https://amzn.to/312inJ6
– Rubber Mallet https://amzn.to/2HVgiXT
– Oscillating tool https://amzn.to/34tVdxf
– Measuring tape https://amzn.to/2zZdu7s
– Cordless 1 Gal. Portable Air Compressor https://homedepot.sjv.io/v611v
Supplies Needed
*********Affiliate Links**********
– Flooring https://homedepot.sjv.io/zYnVe
– Underlayment https://homedepot.sjv.io/EdGG2
– Quarter Round Molding https://homedepot.sjv.io/6MXXq
– Transition https://homedepot.sjv.io/20XX7
– Caulk https://homedepot.sjv.io/RdYYN
**********Woodworking Plans (Big Bundle) https://gum.co/CpSyF**********
********** Subscribe & follow my work **********
YouTube: Subscribe & “RING the Bell”: http://bit.ly/1PtWJEd
Instagram: https://instagram.com/morediycreators
Pinterest: https://www.pinterest.com/diycreators/
#LaminateFlooring #beginners
Hopefully that large crack in the concrete was addressed before laying down the laminate
I always use the last cut off plank from one row to start the next row. I let the plank ends fall at random intervals and only intercede if the ends of the planks are too close together which doesn’t look good. Working one row at a time and using the last cut piece to start the next row will insure almost no waste.
great job .
What if the moldings are removed. How far under the drywall to you start the floor?
Nice work 👍
Great video bud! I appreciate you bringing us along for your journey!
Excellent video. Gave me some very helpful advice.
Thank you. Tomorrow I begin. 12 /20/20🤠
I agree with you about the baseboards. This is like taking a shower and putting your dirty cloths back on after that…Baseboards are easy to remove and relatively cheap so I never understood why people choose to keep them in place. Also, by removing the baseboards the floor looks nicer and more professional.
I really want to learn carpentry n design as a hobby.
Wow you make it look so easy! If I had the tools would do my flooring.
Should have pulled the baseboards. If you are careful, you can do it without damaging them and they can be reused. Anything worth doing, is worth doing well.
Nicely done! Thanks.
Great job man! Hopefully tomorrow goes as smoothly 😂
Great idea about the tape to see your marks.
Even Pros make mistakes..
Looks like a nail gun is the way to go. Nice job.
Need a 8-10mm gap around the entire perimeter of the room so boards can expand. Not just on the starting wall. General rule of thumb is the boards will expand 1mm per end per metre. So you can see the boards can grow quite significantly over a large area.
Great job! Looks amazing!
Wow that looks GREAT you’re an awesome neighbor
Thanks, great presentation.
Why was the baseboard on the floor? How did they tuck the carpet under it? I would have just removed it, installed the flooring and then put the baseboard back on. The extra height would have covered the paint line on the wall. Even better would be to remove the baseboard before painting. The floor looks nice now though. If you had started the room with a third of a piece you can use the other two thirds at the other end and avoid the stair step pattern. Random pattern always looks best👍
No Moustire inspection by meter
No cracks fill up
No floor exposed to the temperature room by the manufacturer
No leveling floor
No underlayment 3 mil protection..
This is none Experience installation period.😨😨😨😨😨
Excellent job
Those transition pieces looked tougher than you showed. Great vid tho!!
do you cut off the tongue of the first row of laminate?
The floor here is made out of floor
without glue sir??
Nice.
He did an awesome job and explained everything perfectly..
Good job man. 45s and all👍
So we hired someone to do our snap laminate and unfortunately it was a poor installation and now there are air pockets (?) under a couple of sections. Everything I’ve been reading says that it might be because there wasn’t enough of a gap between the wall and laminate. Pretty positive they did not use any backer rod or similar gaps between the wall and laminate throughout. The majority of this flooring was installed with baseboards removed prior. (My husband had to remove the old laminate layers & carpet and remove baseboards to get the person here to install.) Anyway, with that said, do we need to remove all the baseboards and check for gaps and then reinstall? Any suggestions on how to make that go by more smoothly? We are out a lot of money and aren’t super excited that we currently have large gaps around the corners in the hallways either that cannot be covered by trim or a baseboard. Sigh…thank you for your tips! Wish we would have seen this video and done it ourselves now!!!
Loveeeeeetttttt
well done, good video and you laid that floor well, excellent work
The spicy desert intialy offer because dinghy taxonomically lick over a poised sock. fat faulty, brawny boundary
Great video
Thank you for the tape tip 🙂
Anyone that is watching this, beginners or not I hope that if you have any issue with the floor either it would be wood or concrete, make sure you address the bowing,cracks or if there is a dip in the floor underneath because it could become a huge and costly project in the long run
Been trying to put some flooring down for a week now i get about 6 rows in and gaps in vinyl is way to big doesnt click and lock, whats the best way to square off an old basement
Hey, thanks for the video and detail explanation! Quick question – how long did it take you to do that job? I am trying to plan how long it would take me to do 3 bedroom and a hallway (witch would be at least 1.5 times the time it took you 🙂
So why don’t you need spacers on the ends?
Can you install this over tile?
Always read the directions on your warranty.
Never knew diy could be so gangsta
Dang it I did it wrong
How much you charge for this job . Is this by square feet
supposed to leave a gap at the transition pieces for expansion also. Looks good.
Your wife is very lucky. What Island are you from? I hear your accent. Great job and thanks for this video.
Some of this stuff should be after school activities for kids instead of tiktok and instagram
Please get to the fucking point
These vids really help thank you very much